Work with the remote desktop
SetMe lets you take full control over the remote computer's mouse and keyboard with just one click. You may also choose to just view the remote desktop, or seamlessly switch between the two available modes if you wish to temporarily release the remote mouse and take control back when needed.
In this article:
- Control/view the remote desktop
- Remote desktop window
- Remote desktop toolbar
- View options
- Multiple displays
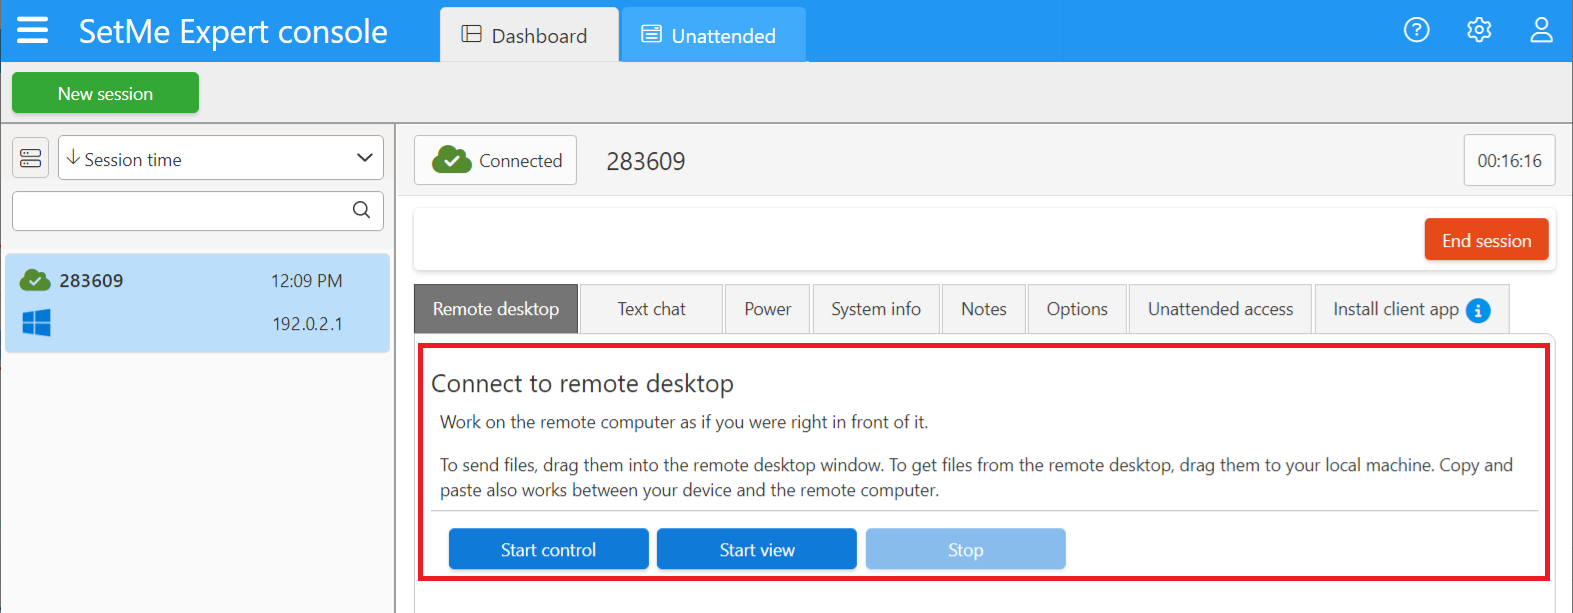
Control/view the remote desktop
Once connected to the remote computer, you will be able to select one of the following available operations for working with the remote desktop:
Start control: provides you with full control over the remote computer's mouse and keyboard. This allows you to perform all tasks as if you were physically working on the remote computer itself, and transfer data to or from the remote computer. Clipboard sharing between you and the remote computer is enabled by default. It can be temporarily disabled and re-enabled at any moment when working in this mode.
Start view: allows you to view the remote desktop without having the ability to control its mouse and keyboard. You will be unable to transfer data to/from the remote computer when working in this mode. Clipboard sharing is always disabled when working in View mode.
When running the Client application on Apple macOS, the remote user will be prompted to enable Accessibility permissions in order to allow access to their desktop.
Remote desktop window
After choosing one of the two operations, the remote desktop window will open.
A red frame will appear around the remote user's screen to indicate when their desktop is being controlled or viewed by you. The frame will remain visible to the remote user for the duration of your connection (learn more about this feature on our blog).
If the remote computer is experiencing a network disruption, restarting, or has been shut down or put into sleep mode, the remote desktop window will display information or error messages with corresponding instructions. Any settings selected within the remote desktop window during such a system event will be automatically applied after the remote computer gets back online. For more information about these messages, see Connection statuses and modes.
Remote desktop toolbar
All key features are available within the toolbar located at the top of the remote desktop window. Certain toolbar features that are unavailable within the View mode are marked accordingly below.

Text chat (1): exchange text messages with the remote user.
Settings (2):
- Hide background picture: allows you to hide or restore the remote desktop's background image.
- Image quality: allows you to change image quality settings for optimal performance.
View mode: allows you to change the size and scaling of the remote desktop in your remote desktop window.
- Custom zoom slider: allows you to zoom in or out on the remote screen.
- Clipboard sharing: allows you to manage clipboard sharing settings.
- Drag-n-drop: Allows you to manage drag-and-drop settings.
- Enable blank screen: temporarily black out the remote screen for extra privacy and security so that no one at the remote end can see what you're doing on the remote computer.
- Lock remote keyboard/mouse: temporarily block the remote keyboard and mouse to prevent user interference.
Data transfer panel (3): allows you to view data transfer statistics for the current remote session, including the count and total size of files, images, text, and other data sent or received. (Unavailable when working in the View mode.)
Multi-display management (4): allows you to choose how to display multiple remote screens.
Send keyboard commands (5) (unavailable when working in the View mode):
- a. Send Ctrl+Alt+Delete: send the Ctrl+Alt+Delete command (Windows) or open the Force Quit menu on the remote desktop (macOS).
When the remote Client application is running without admin rights, the Ctrl+Alt+Del button is disabled. Run as administrator to be able to send the Ctrl+Alt+Del command to the remote computer.
- b. Lock remote screen: send the Windows+L command to lock the remote computer.
- c. Send clipboard as keystrokes: allows you to paste passwords on the remote computer's login screen or in any other situation where copying and pasting text is restricted.
- d. Pause control: temporarily grant control over the mouse and keyboard to the remote user.
Laser pointer (6): highlight certain objects and areas on the remote screen.
Capture remote screen (7): take a screenshot of the remote user's desktop.
Recording (8): start/stop video recording.
Home (9): open the Expert Console.
Full screen (10): enter the full screen mode.
View options as well as hide background picture and clipboard sharing settings can also be changed within the Default settings of your Expert console. In this case, the selected setting will be applied at the start of every remote connection and can be changed manually within the remote desktop toolbar for a specific connection.
View options
SetMe allows you to switch between different view options to get the best remote desktop experience. You can change the following settings when working with a remote desktop window:
View mode
View mode determines how the remote desktop will be sized and fit into your remote desktop window:
- Original size: the remote screen is displayed within the remote desktop window in its actual resolution. You may resize the window at your convenience and use the scrollbars to navigate the remote screen, or view the remote desktop in its entirety.
- Scale to window: the remote screen is automatically scaled to fit the remote desktop window. If you expand the window, the remote desktop will be scaled up. When you reduce the size of the window, the remote desktop will be scaled down accordingly. Scrollbars will never appear when working in this mode.
- Optimal view: SetMe identifies the most convenient way to view the remote desktop based on your and the remote computer's screen resolution settings. The remote desktop window can be scrolled and scaled when working in this mode.
- Custom zoom: use the zoom slider to select custom settings and zoom into a portion of the remote screen. You can also zoom out to see the remote desktop at a reduced size.
Image quality
The following image quality options are available:
- High Speed: the remote desktop is displayed as an 8-bit color image. Select this option if you're experiencing delays in working with the remote desktop.
- Optimal Speed/Quality: the remote desktop is displayed as a 16-bit color image. We recommend setting this as the default option.
- High Quality: the remote desktop is displayed as a 24-bit color image. Select this option if you need to view the remote desktop in its greatest detail.
Multiple displays
The Multi-display option is enabled within the remote desktop toolbar when connected to a multi-monitor remote system. In this case, you may choose to show all displays in a single window (1), view each remote display in its own window (2), or select an individual display to work with (3) and toggle between the remote displays with the forward/back buttons (4, 5).

Related articles